Get ready. Software will get installed, configuration files will get edited, nodes will boot, lights will blink, messages will get passed, and we will have a cluster. Joy.
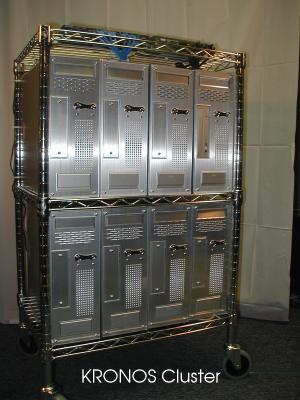
If you are following along from part one of this series, you should be chomping at the bit to get some software on the cluster. Not to worry, in this installment will get those switch lights blinking. The entire cluster measures, 40 inches (102 cm) high, 24 inches (61 cm) wide, 18 inches (46 cm) deep and is shown in Figure One Below. (See part one for more and bigger pictures). It is also quite mobile (check out the wheels!). There is a single power cord and room on top of the rack to place a monitor and keyboard (only if needed). The DVD reader/burner can accommodate vertical loading as well.

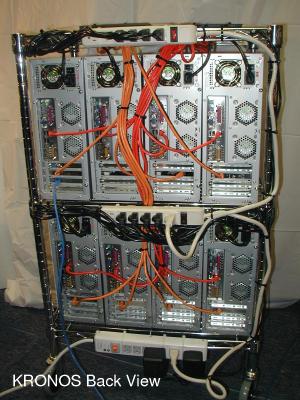
Although the font view has a certain clean look to it, the back of the cluster is where the wiring details can be seen. In Figure Two (below) you can see the how most of the wiring (both network and electrical) was done. Clean wiring is possible, but it does takes a little time, patience, and big bag of "zip-ties." The white cords are the power-strips (three total), the black cords are the power cords for the nodes, the red cables are the Fast Ethernet cables, the orange cables are the Gigabit Ethernet cables. The single blue cable is the local LAN connection. Note: the middle two nodes are missing their Gigabit NICs (they were DOA). The black bands around the cables are plastic 7 inch "zip" wire ties.
Don't worry if your cluster does not look exactly like the pictures. Customize it to your needs. After all, that is what clustering is all about.
In this installment, we are going to load up the software. This step will probably be the most challenging. Although we will provide step by step procedures, hardware problems (if any) usually show up at this point. Once we get past the initial software installation and start booting nodes, then we will have a common "baseline" from which to proceed. We need to start at the lowest level first and set up the BIOS.
BIOS Settings
There are few BIOS setting that will help improve cluster functionality. The easiest way to set up the BIOS is to move from node to node with a monitor and keyboard. If you are lucky enough to have a KVM (Keyboard/Video/Mouse combiner) the you can attach it to the cluster. Note, however, that after installing the software you should only need to attach a monitor to the compute nodes when there is a problem.When the node boots-up press F2 several times and enter the BIOS screen. Don't worry if the date and time are incorrect. We can set these from the command line once the nodes are up and running. Move to the Advanced menu item on the top of the screen. Move down and select the Chipset Configuration item and hit enter. You will see an option for Onboard VGA Share Memory. Set this to 32MB. This option reduces the shared video memory to the minimum value.
Next, use the Esc to move back up to the main menu. Move to Power and select Restore on AC/Power Loss and set it to Power On. This setting will allow the node to be controlled by externally shutting the power off an on. Otherwise you may find yourself having to push eight buttons every time you want power cycle the cluster. Next move down to the PCI Devices Power On option and select Enabled. In a future installment, we will show to use the "poweroff" command and "wake-on-lan" to automatically control the power state of each node in the cluster.
Finally, move over to the boot menu. Move down to Boot From Network and select Enabled. Without this setting, the nodes will not be able to get their RAM disk image from the master node. (See Sidebar One). To exit, move to Exit and select Exit Saving Changes and the system will reboot.
| Sidebar One: The Warewulf Cluster Distribution | ||||||||||||||||||||||||
 Figure Two: Back View of Kronos In deciding which software would be best suited for a small personal cluster we chose the Warewulf distribution (see the Resources sidebar). Warewulf had many nice features that allow you to manage the cluster. We chose to use disk-less nodes to keep our cost low, but also to eliminate version skew and excessive image copying required by many other cluster distributions. To keep things simple, Warewulf uses a small ramdisk (hard disk emulated in memory) on each compute node to hold the minimum number of files required to run the node. Once booted NFS is available for mounting things like /home or /opt. Warewulf is based on building a Virtual Node File System (VNFS) on the master. Once you have this files system built, it is packaged and sent to the computer nodes when they boot up. The VNFS image can be made very small (30-40 MB) as it contains only what you need to run codes on the nodes. If you run a du -h on a compute node you will see something like the following:
The amount of files (libraries and executables) to "just run binaries" on the compute nodes is surprisingly small. The advantage of this approach is that the nodes are managed from one place (the master node) and will not develop "hard drive personalities" that make administration difficult. In addition, nodes can be quickly rebooted with different kernels, libraries, etc. without having to wait for hard drive spin up, file system checks, or other overhead. We will talk more about the Warewulf concept in future installments of this series. Of course the VNFS "eats" into the available RAM on the computer nodes, but we believe that memory density will continue to increase and cost will continue to drop so that a 50-60MB RAM disk will be become a small percentage of available memory. Note, we also give up 32 MB to the video system, but the same argument applies, RAM is cheap, the incremental cost of adding 128 MB more of RAM to cover that lost to both the video and ramdisk is less than $20 per node. Finally, it is important to note that everything on the compute nodes is lost upon reboot. All the configuration aspects of the nodes are managed from the VNFS on master node and not by editing configuration files on the compute nodes. Some users are surprised to find that vi is not installed on the compute nodes. |
The Base Installation
By itself Warewulf is not a complete cluster distribution. It requires an underlying Linux install to be useful. For this project, we have chosen to use the Red Hat Fedora Core 2 (FC2) distribution. This distribution is both widely available and widely documented. Finding help for FC2 should not be too difficult.We also started using FC2 when we began the project. Although FC4 is out, we thought it would be wise to stick with with the version we have tested. There is also a bit of a chicken-and-egg problem with downloading and creating the FC2 DVD. If you have another computer with a standard CDROM, but no DVD burner, then you will have to make multiple CDROMs. No big deal, but you will need to wait until you get Fedora installed before you can use that new DVD burner. In any case, you may need to do some installation gymnastics to get FC2 installed. Also, we found growisofs to be a good tool for burning DVD images.
| Sidebar Two: Kronos has Arrived - Doug's Thoughts |
| From my experience working with cluster builders and users, the most difficult part is often figuring out what to name the cluster. After I got the value cluster on the wire shelves, an image from on old sci-fi B movie popped into my head. The movie was called KRONOS and it depicted a big cube type thing from outer space. Of course, it did what all things from outer space do when they land on earth -- start destroying everything in sight. I'm hoping the newly christened Kronos cluster will be a bit more tame. |
You can install FC2 just about any way you want (within reason) of course. We chose to install it using the workstation configuration. There are a few customization points along the way where you will need to make some choices. If you are new to the process, you may wish to consult the Fedora website or some of the books on Fedora Core 2. We chose, after adding 512 MB swap partitions to each drive, to configure the remaining space as a RAID 1 partition (mirroring). If you prefer, you could use a RAID 0 (stripping) and get about 300 GBytes of storage. The RAID 1 partition gave about 151 GBytes of mirrored storage on the two drives.
When the installation asks about Ethernet connections, you should see three interfaces listed. (eth0, eth1, eth2) the first interface eth0 will be the local LAN connection and should be the additional 100BT NIC that was added to the master node. (Recall the master node has three NICs; the on-board 100BT used for cluster administration, an Intel 1000BT NIC used for computing, and an Intel 100 NIC to connect to a LAN) Configure eth0 for your LAN (DCHP or a static IP address). For eth2, which is a fast Ethernet connection that we will use for booting the nodes, NFS, and administration, we used an IP of 10.0.0.253 with a subnet mask of 255.255.255.0. For eth1, which is the Gigabit Ethernet connection, we chose an IP of 10.1.0.253 with a subnet mask of 255.255.255.0. The hostname was of course kronos. We also entered the gateway as 192.168.1.1, but this really depends upon how your cluster is connected to the outside world.


