[Note: If you are interested in desk-side/small scale supercomputing, check out the Limulus Project and the Limulus Case]
In January 2007, two of us (professor Joel Adams and student Tim Brom) decided to build a personal, portable Beowulf cluster. Like a personal computer, the cost had to be low -- our budget was $2500 -- and its size had to be small enough to sit on a person's desk. Joel and Tim named their system Microwulf, which has broken the $100/GFLOP barrier for double precision, and is remarkably efficient by several measures. You may also want to take a look at the Value Cluster project for more information on $2500 clusters.
We wanted to mention that Distinguished Cluster Monkey Jeff Layton helped us write this article. In order to provide more than just a recipe, we also provide a discussion of the motivation, design, and technologies that have gone into Microwulf. a an aid to those that want to follow us, we also talk about some of the problems we ran into, the software we used, and the performance we achieved. Read on and enjoy!
Introduction
For some time now, I've been thinking about building a personal, portable Beowulf cluster. The idea began back in 1997, at a National Science Foundation workshop. A bunch of us attended this workshop and learned about parallel computing, using the latest version of MPI (the Message Passing Interface). After the meeeting we went home realizing we had no such hardware with which to practice what we had learned. Those of us who were lucky got grants to build our own Beowulf clusters; others had to settle for running their applications on networks of workstations.
Even with a (typical) multiuser Beowulf cluster, I have to submit jobs via a batch queue, to avoid stealing the CPU cycles of other users of the cluster. This isn't too bad when I'm running operational software, but it is a real pain when I'm developing new parallel software.
So at the risk of sounding selfish, what I would really like -- especially for development purposes -- is my own, personal, Beowulf cluster. My dream machine is small enough to sit on my desk, with a footprint similar to that of a traditional PC tower. The system must also plug into a normal electrical outlet, and runs at room temperature without any special cooling beyond my normal office air conditioning.
By late 2006, two hardware developments had made it possible to realize my dream:
- Multicore CPUs became the standard for desktops and laptops; and
- Gigabit Ethernet (GigE) became the standard on-board network adaptor.
In the fall of 2006, the CS Department at Calvin College provided Tim Brom and I with a small in-house grant of $2500 to try to build such a system. The goals of the project were to build a cluster:
- Costing $2500 or less,
- Small enough to fit on my desk, or fit in a checked-luggage suitcase,
- Light enough to carry to my car (by hand),
- Powerful enough to provide at least 20 GFLOPs of measured performance:
- for personal research,
- for the High Performance Computing course I teach,
- for demonstrations at professional conferences, local high schools, and so on,
- Powered via one line plugged into a standard 120V wall outlet, and
- Running at room temperature.
There have been previous efforts at either small transportable clusters or clusters with a very low $/GFLOP. While I don't want to list every one of these efforts, I do think it's worthwhile to acknowledge these efforts. In the category of transportable clusters, the nominees are:
As you can see the nominees for transportable Beowulf systems is short but distinguished. Let's move on to clusters that are gunning for the price/performance crown.
- 2005: Kronos
- 2003: KASY0
- 2002: Green Destiny
- 2001: The Stone Supercomputer
- 2000: KLAT2
- 2000: bunyip
- 1998: Avalon
There are more lower cost clusters that have laid claim at one time or another to being the price/performance king. As we'll see, Microwulf has the lowest price/performance ratio ($94.10/GFLOP in January 2007, $47.84/GFLOP in August 2007). than any of these.
Designing the System
Microwulf is intended to be a small, cost-efficient, high-performance, portable cluster. With this set of somewhat conflicting goals, we set out to design our system.
Back in the late 1960s, Gene Amdahl laid out a design principle for
computing systems that has come to be known as "Amdahl's Other Law".
We can summarize this principle as follows:
To be balanced,
the following characteristics of a computing system should all be the same:
The basic idea is that there are three different ways to starve a computation: deprive it of CPU; deprive it of the main memory it needs to run; and deprive it of I/O bandwidth it needs to keep running. Amdahl's "Other Law" says that to avoid such starvation, you need to balance a system's CPU speed, the available RAM, and the I/O bandwidth.
For Beowulf clusters running parallel computations, we can translate Amdahl's I/O bandwidth into network bandwidth, at least for communication-intensive parallel programs. Our challenge is thus to design a cluster in which the CPUs' speeds (GHz), the amount of RAM (GB) per core, and the network bandwidth (Gbps) per core are all fairly close to one another, with the CPU's speeds as high as possible, while staying within our $2500 budget.
With Gigabit Ethernet (GigE) the defacto standard these days, that means our network speed is limited to 1 Gbps, unless we want to use a faster, low-latency interconnect like Myrinet, but that would completely blow our budget. So using GigE as our interconnect, a perfectly balanced system would have 1 GHz CPUs, and 1 GB of RAM for each core.
After much juggling of budget numbers on a spreadsheet, we decided to go with a GigE interconnect, 2.0 GHz CPUs, and 1 GB of RAM per core. This was purely a matter of trying to squeeze the most bang for the buck out of our $2500 budget, using Jan 2007 prices.
For our CPUs, we chose AMD Athlon 64 X2 3800 AM2+ CPUs. At $165 each in January 2007, these 2.0 GHz dual-core CPUs were the most cost-efficient CPUs we could find. (They are even cheaper now - about $65.00 on 8/1/07).
To keep the size as small as possible we chose MSI Micro-ATX motherboards. These boards are fairly small (9.6" by 8.2") and have an AM2 socket that supports AMD's multicore Athlon CPUs. More precisely, we used dual-core Athlon64 CPUs to build an 8-core cluster, but we could replace those CPUs with AMD quad-core Athlon64 CPUs and have a 16-core cluster, without changing anything else in the system!
These boards also have an on-board GigE adaptor, and PCI-e expansion slots. This, coupled with the low cost of GigE NICs ($41), let us add a GigE NIC to one of the PCI-e slots on each motherboard, to try to better balance the CPU speeds and network bandwidth. This gave us 4 on-board adaptors, plus 4 PCI-e NICS, for a total of 8 GigE channels, which we connected using an inexpensive ($100) 8-port Gigabit Ethernet switch. Our intent was to provide sufficient bandwidth for each core to have its own GigE channel, to make our system less imbalanced with respect to CPU speed (two x 2 GHz cores) and network bandwidth (two x 1 Gbps adaptors). This arrangement also let us experiment with channel bonding the two adaptors, experiment with HPL using various MPI libraries using one vs two NICs, experiment with using one adaptor for "computational" traffic and the other for "administrative/file-service" traffic, and so on.)
We equipped each motherboard with 2 GB (paired 1GB DIMMs) of RAM -- 1 GB for each core. This was only half of what a "balanced" system would have, but given our budget constraints, it was a necessary compromise, as these 8 GB consumed about 40% of our budget.
To minimize our system's volume, we chose not to use cases. Instead we went with an "open" design based loosely on those of Little Fe and this cluster. We chose to mount the motherboards directly on some scrap Plexiglas from our shop. (Scavenging helped us keep our costs down.) We then used threaded rods to connect and space the Plexiglas pieces vertically.
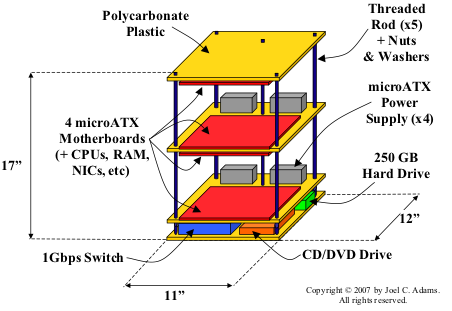
The bottom layer is a "sandwich" of two pieces of Plexiglas, between which are (i) our 8-port Gigabit Ethernet switch, (ii) a DVD drive, and (iii) a 250 GB drive. Above this "sandwich" are two other pieces of Plexiglas, spaced apart using the threaded rods, as shown in Figure One below:

As can be seen in Figure One, we chose to mount the motherboards on the underside of the top piece of Plexiglas, on both the top and the bottom of the piece of Plexiglas below that. and on the top of the piece below that. Our aim in doing so was to minimize Microwulf's height. As a result, the top motherboard is facing down, the bottom-most motherboard is facing up, one of the two "middle" motherboards faces up, and the other faces down, as Figure One tries to show.
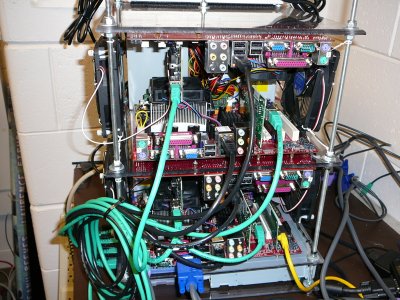
Since each of our four motherboards is facing another motherboard, which is upside-down with respect to it, the CPU/heatsink/fan assembly on one motherboard lines up with the PCI-e slots in the motherboard facing it. As we were putting a GigE NIC in one of these PCI-e slots, we adjusted the spacing between the Plexiglas pieces so as to leave a 0.5" gap between the top of the fan on the one motherboard and the top of the NIC on the opposing motherboard. As a result, we have about a 6" gap between the motherboards, as can be seen in Figure Two:

(Jeff notes: These boards have a single PCI-e x16 slot so in the future a GPU could be added to each node for added performance).
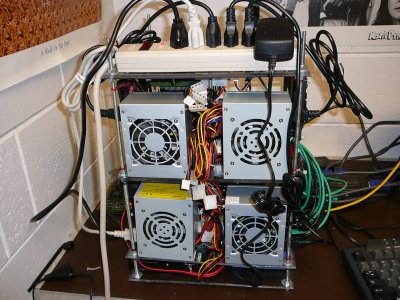
To power everything, we used four 350W power supplies (one per motherboard). We used 2-sided carpet tape to attach two power supplies to each of the two middle pieces of Plexiglass, and then ran their power cords to a power strip that we attached to the top piece of Plexiglass, as shown in Figure Three:

(We also used adhesive velcro strips to secure the hard drive, CD/DVD drive, and network switch to the bottom piece of Plexiglass.)


